Ingredients:
1 2-3 lb tri-tip roast (see below for selection tips)
1-1/4 teaspoon kosher salt (or just shy of 1 teaspoon of table salt)
1-1/4 teaspoon fresh ground black pepper
1 teaspoon garlic powder/granulated garlic (not garlic salt!)
1-1/2 teaspoons lime juice
Can of olive oil cooking spray
~1/2 lb dry manzanita chunks (my favorite for beef) or oak chunks/chips (wine barrel chunks work nicely). Whatever you use, make sure it's been dead and dried for at least a year and doesn't have any kind of treatment done to it.
Selecting a Roast
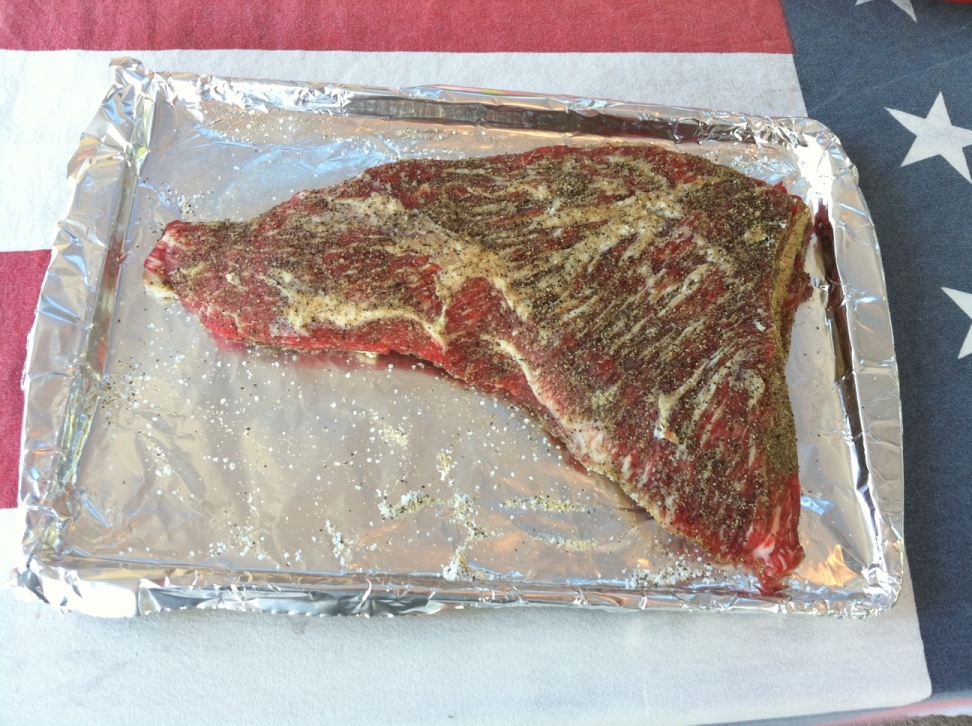
A tri-tip is triangular in shape, and if the points are too long and thin, they cook much faster. I like a roast that has blunt, rounded points on it, with as consistent a thickness as possible. This way, all of the meat cooks more consistently. That said, those points will get well-done, and if you have someone around who likes their meat well-done (yuck!), there you go! It may make your life easier to get a roast with long, thin tips on it. Also, don't get a roast that is really lean... the marbling of fat makes it taste better. Be sure to get a USDA Choice grade roast, or if you're feeling spendy, get a Prime (likely gonna cost $10/lb or more, but may be worth it to you!) Whatever you do, don't get a "Select" grade roast... it's not worth cooking. I've had great luck with the nicely-marbled roasts at Raley's and Bel Air markets here in Northern California. They seem to be "Choice +" grade. The one shown below is very nice (shown after spices are added). Look for the tiny threads of fat throughout the meat.
Preparing the Roast
First, trim the fat pad from the back of the roast, as well as any extraneous chunks of fat or dangling scraps of meat or membrane. You're cooking this meat quickly enough that the fat won't really do anything beneficial... it just renders out and feeds the fire. The roast should have enough marbling to keep things flavorful and moist inside. Next, mix all dry ingredients thoroughly in a small dish to make a "dry rub". Sprinkle the rub all over the roast and either rub in with your hand or the back of a large spoon. Don't forget the edges of the roast. Next, sprinkle about 3/4 teaspoon of lime juice on each side of the roast. Toss the roast in a gallon ziploc bag and refrigerate for at least a few hours, preferably overnight. this is very important! The salt will dissolve and soak into the meat, flavoring it throughout, and the lime juice will give it a slight tang that works well with the salty and savory flavors, and "brightens" the taste to offset the deep, "dark" flavor of the smoke. This is a recent addition to the recipe, and it was the answer to "Hmm... it's kinda missing something..."
Cooking the Roast

Start the cooking process 1.5-2 hours before you plan to serve the meat. Giving the meat plenty of time to rest is essential!
If cooking over coals: I recommend Kingsford Competition briquettes, because they're 100% natural and don't add extra flavors. Fire up some coals (~3/4 chimney, if you have a chimney starter) and take the meat out of the fridge. When the coals are just ashed over, lay them in a single layer, concentrated into about 1/3 of the charcoal grate. Just before cooking, coat both sides of the meat with olive oil cooking spray. This will help with the browning process, and will help keep the meat from drying out. Sear the meat directly above the coals, cooking all sides of the meat until brown and crunchy. Use a long pair of metal tongs (nice, sturdy ones) and a heavy leather glove to stand the meat on edge to sear the edges as well. The hotter the fire, the better. If you can lower your cooking grate to just over the coals, it'll work even better. When the meat is seared, put it on the cooking grate on the opposite side of the grill from the coals, so it doesn't see any direct heat. At this point, add the smoking wood chunks. If you set them on the grill directly over the fire, they should get about the right amount of heat to generate smoke... It'll depend on your specific grill. If not, toss 'em right on the coals. Put the lid on the grill, and open the dampers so that the air temperature near the meat is about 300-350 degrees. This is called "offset" or "indirect" cooking, and is similar to a convection oven. If you see the smoke stop coming out, add more smoking wood.
If cooking on a gas grill: Crank up the grill to high on all burners, making sure the drip pan of your grill isn't full of drippings and grime or it may catch on fire. Take the meat out of the fridge. Just before cooking, coat both sides of the meat with olive oil cooking spray. This will help with the browning process, and will help keep the meat from drying out. When the grill is rippin' hot, after about 10 minutes of preheating, sear the meat directly above the fire, cooking all sides of the meat until brown and crunchy. Use a long pair of metal tongs (nice, sturdy ones) and a heavy leather glove to stand the meat on edge to sear the edges as well. The hotter the fire, the better. When the meat is seared, put it at one end of the top rack and turn off the burner below it so it doesn't see any direct heat, then turn the other burners to low (or whatever gets you a temperature near the meat of 300-350 degrees). At this point, add the smoking wood chunks. If you set them on the grill directly over the fire, they should get about the right amount of heat... It'll depend on your specific grill. Putting the chips over one burner on high instead of two burners on low might be better, as a burner on low might not burn the chips. Close the lid on the grill and cook. This is called "offset" or "indirect" cooking, and is similar to a convection oven. If you see the smoke stop coming out, add more smoking wood.
Using either method: Cook until the internal temperature reaches about 135 (should take about 45 minutes). Remove from heat and immediately wrap in foil. Use heavyweight foil so holes won't get poked in it, and make sure all seams are up high, since this tri-tip will make about 1/4 cup of au jus (drippings). You want to keep the au jus... it's like friggin' GOLD. Place the foil-wrapped tri-tip in a 6-pack ice chest (without ice... this is to keep it warm). You can put it in a ziploc bag after wrapping with foil if you'd like, to avoid spilling juice everywhere, but it's not necessary if you're careful. Draping a dish towel over the foil-wrapped roast is a good idea too, in order to keep more heat in. Of course, close the lid on the ice chest. Let the meat rest like this for at least 20 minutes, or until you serve it... it'll stay plenty warm for about 2 hours. During this time, the meat will be getting slightly more tender as some of the proteins break down, and the juices will be redistributing throughout the meat.
Carving the Roast

After carving, put the slices with the edges up on a serving plate or in a shallow dish and pour the au jus over the top, so it wicks in between the slices. Sneak the best looking slice for yourself, dangle it over your mouth and eat it in one bite like a true carnivore, making sure to taunt the people around you.
Alternatively, if you let it rest for a couple hours and then put it in the refrigerator, you can slice it VERY thin after it's cooled. These slices can then be reheated very quickly by tossing them into a hot skillet for about 15 seconds... Just warm 'em up; don't over cook 'em! They taste great by themselves or on a sandwich, and are even really good cold, if you like that kind of thing (like I do).
Enjoy!
Recommended Equipment
I strongly recommend this thermometer:
http://www.yardandpool.com/ProductDetails.asp?ProductCode=ET-73
It has dual probes: One that clamps to the cooking grate and one that goes into the food, and it has a wireless base unit that you can put inside the house and watch what's going on in the grill. This is a great way to ensure that your meat is seeing the right air temperatures around it, and lets you know when your meat is done. This thermometer (and the ET-7) have been incredibly useful for me.

Good to see you back at work taunting me with food (especially meat) pictures!
ReplyDeleteI should start posting more pics here, instead of just on my FB page...
ReplyDelete